
If it’s grilling season (or if it’s not, but you just want to fire up the barbecue), that means fire– open flames in your backyard that may or may not stay lit. Many factors affect the food you prepare, but nothing as much as the fire you’re using, and if you can’t keep that fire burning, you can’t cook over it.
To keep your grill lit, you need to make sure the fire has the three things it needs: heat, oxygen, and fuel. Knowing why your fire keeps going out is also crucial to remedying the problem.
Once you know how to keep a grill lit, you’ll be able to spend time worrying about other things like rubs, marinades, and everything else that makes grilled foods delicious.
What Every Fire Needs
Before you can keep your fire lit, you have to get your fire lit. Any fire needs three things: oxygen, heat, and fuel. This trio is known as the fire triangle!
Without it, your fire is doomed to fail, which is why we pile wood in the fire pit (fuel), light a match (heat), and fan or blow on the flames (oxygen).
Everyone has their preferred method of lighting fires, and some people have specific wood-stacking strategies, but no one has figured out how to create a fire without the fire triangle.
What Your Charcoal Grill Fire Needs
Building a fire in your charcoal grill is no different from any other fire up to a point.
Perhaps the most significant difference between your grill fire and a forest camping trip campfire is the fuel. In your charcoal grill, by definition, you’re using charcoal, whether briquettes or lump charcoal and not sticks gathered from the forest floor.
Lighting your charcoal grill fire has its own procedures, as well, and some of them cause debate in the charcoal grill world.
Step 1: Starting Your Charcoal Grill Fire
Knowing how to keep a grill lit won’t matter at all if you can’t get a fire going in the first place. The specifics of lighting your fire depend mainly on two things: what you’ve decided to burn in your grill and how you’ll start it!
There are two main methods.
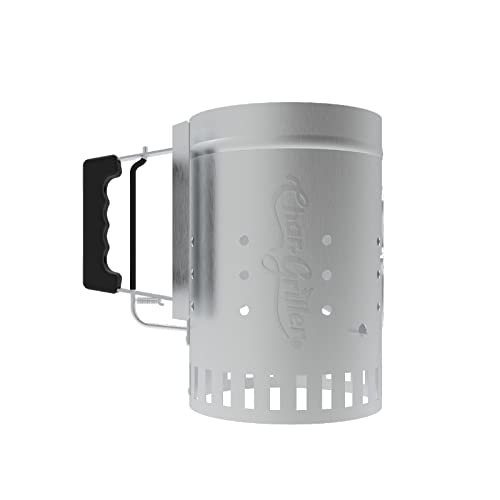
Method #1 – The Chimney Starter
My favorite approach is to use a chimney starter. This involves simply piling your charcoal in a wide-ish metal tube, lighting it, and waiting for coals to form!
Stacking the charcoal and and using a piece of paper or natural firestarter beneath it reliably ignites the charcoal without using chemicals you’d get from lighter fluid.
Two huge benefits of the chimney starter are that it:
- Doesn’t require chemicals
- Stacks the charcoal vertically so that coals form faster
If you were to spread your charcoal out horizontally, the heat is also spread out meaning that it’s harder to form coals.
Focusing the fire’s heat keeps the reaction of the fire going, and since heat rises, vertically stacking your fuel creates something of a feedback loop: heat from the flames at the bottom rises to the fuel at the top and contributes to better coal formation.
Good coals = good fire!
No products found.Method #2 – Lighter Fluid
Using lighter fluid is a fast and easy solution– pour an accelerant on flammable materials, strike a match, and say to yourself, “Hey! Fire!.”
But many charcoal grillers might disapprove of this method because they arguE that lighter fluid adversely affects the taste of the grilled food. Especially if you don’t wait long enough for it to completely burn off!
An alternative to lighter fluid exists in products like Kingsford’s Matchlight charcoal briquettes, which is essentially charcoal infused with lighter fluid. All you need to do is stick a match to it and shouldn’t need any other fluids or accelerants.
Yes, lighter fluid is involved, but fan of this simple approach say this method makes less of an impact on flavors.
My favorite approach is to stick with a chimney starter, but if it’s only a good fire that you care about, then this will work as well!
Step 2: Maintaining the Burn
You’ve lit your fire, or at least gotten something to ignite, but you can’t immediately throw food on the grill.
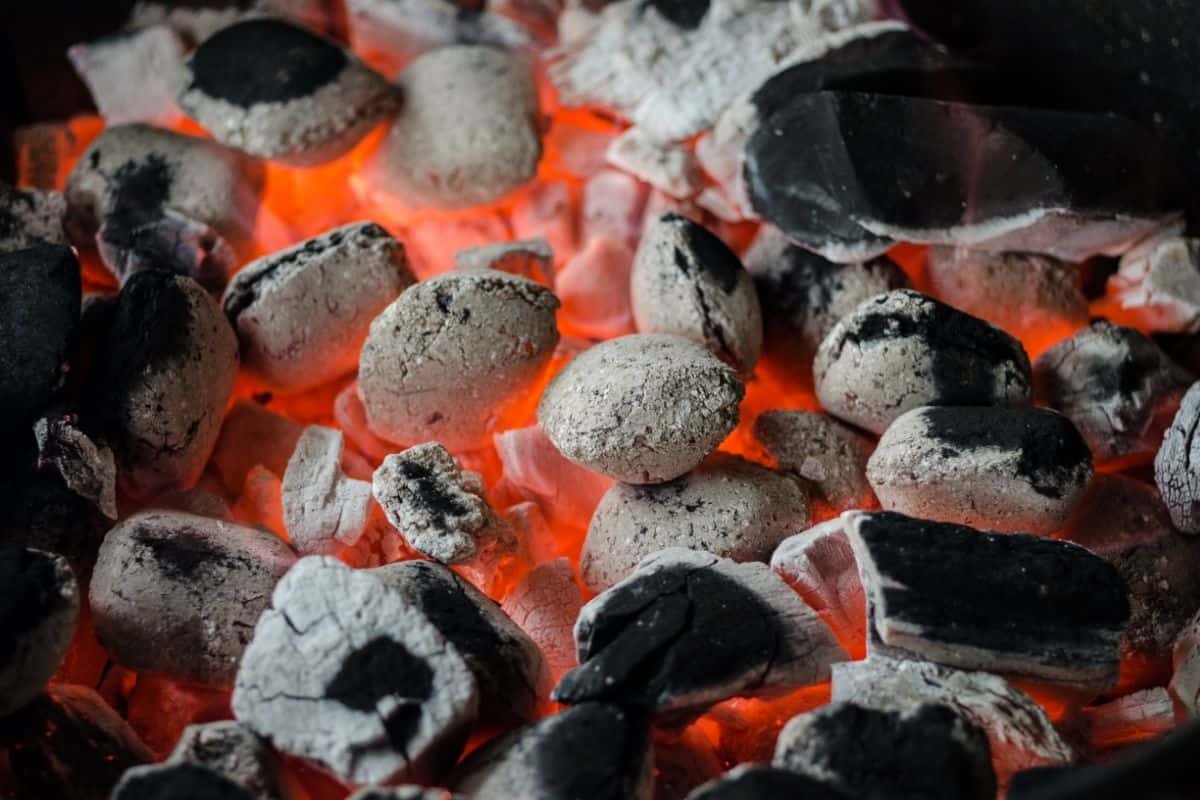
Regardless of which approach you use to igniting your charcoal it’s critically important to WAIT for the formation of coals before you spread out the charcoal.
You’ll know that coals have formed by their glowing red/orange appearance, and the charcoal’s exterior will have turned from its original dark gray or black color to an ashy white.
Only once this has happened is it safe to spread out your charcoal.
You have to wait until the charcoal has turned to coals, your cooking surface is hot, and your grill has heat evenly distributed.
All of this takes time to achieve, and time can kill your fire if anything is amiss. To make fire, you needed three things. Just like you needed specific elements to create the fire, you’ll need to remember three more things to keep your grill lit:
Avoid Moisture
Some moisture will be beyond your control. Grilling in the oppressive humidity of Houston presents more issues than doing so in Phoenix, where the humidity is more of a dream than a reality.
Humidity will cause you some problems, as will rain. In the face of these, you’ll just have to do your best!
Then there’s moisture you can control. Keep your charcoal stored in a place where there’s little to no chance of it getting wet, and if you’re adding wood chips to the mix for extra flavoring, it must stay dry, too, and can’t be too new.
Older wood is dryer wood. Lots of moisture in your wood chips will do more to hurt your fire than help your flavors
Use the Dampers
Charcoal grills have air vents in the lid and at the bottom. These are called dampers, and they allow for the adjustment of airflow.
If you close all these dampers and put the lid on your fire once you’ve gotten it lit, chances are it’s going to die due to lack of oxygen!
When starting your fire, open the bottom dampers all the way. More oxygen means a better burn.
To maintain your fire, you may want to close your dampers partially (maybe to make the fire a little cooler), but don’t close them all the way. Without sufficient oxygen, your grill will not stay lit.
Replenish Your Fire’s Fuel
Perhaps the most overlooked part of keeping your grill lit is the charcoal itself. If you’re cooking one burger, this may not be an issue.
But your charcoal burns, which means that it gets used up eventually, and you’re left with no charcoal. Every 30 minutes or so, add a few lumps or briquettes.
Don’t add more than half the amount that’s already smoldering in the grill. Fire is a chemical reaction that changes things into other things.
Fire turns charcoal into ash. If your grill’s fire runs out of charcoal to change into ash, you run out of fire.
Step 3: Tend Your Fire
Starting a fire can be the easy part. Charcoal grilling enthusiasts may argue a lot of points, but they will agree that maintaining the fire is at least partly where the art lies.
Just like you can’t simply drop a match on a log and expect to have a fire, you can’t start a fire, walk off and ignore it, and expect it to serve its purpose.
Knowing how to keep a grill lit is vitally important. No matter how extensively you’ve prepared your meat or veggie kabobs or pizza for the grill, if your fire dies, none of it will matter at all. Make sure your fuel is dry, check to see if oxygen is getting to that fuel, and keep your fuel stocked.
When you take care of your things, your things will take care of you, and the fire in your grill is no different.
