Vinyl plank floors are handy when revamping your home, as they give a stylish and modern look. However, they can be uneven and show bumps and molds after some time. If you’re also facing the same problem, you must wonder if you can remove your old vinyl plank flooring and reinstall it.
You can remove vinyl plank flooring and then reinstall it with the floating floor method. It’s a terrific way to save some money instead of replacing the entire floor. Also, it is environmentally friendly, as waste won’t end up in the junkyard.
Read on to know more, as we’re going to share the basic techniques you must employ when laying down the vinyl plank flooring.
Can You Pull Up and Reuse Vinyl Plank Flooring?
You can easily pull up and reuse the vinyl plank flooring again. However, when removing and restoring laminate flooring, it’s critical to employ the proper equipment and methods.
For that, experts recommend using a flooring puller to ensure that you lift the planks uniformly when removing the flooring.
One advantage of removing the vinyl flooring is that it does not easily gets damaged by force applied to it for removal. This makes them a good choice for reuse.
However, once you’re done with removing the planks, it is advised to inspect the laminate boards before installing them to adjourn any last minute mishaps.
You need to check whether the planks are in good shape. And most importantly, make sure they show no outward evidence of degradation.
To restore the planks, just apply wood glue and tap them into place with a pry bar. Also, ensure enough time for the glue to dry before allowing foot traffic on the floor. If you follow these steps, you can easily reuse your flooring, which will endure for a long time.
How Do You Remove Vinyl Plank Flooring Without Damaging It?
With a little care and attention, you can remove vinyl plank flooring without damaging it. Vinyl flooring is extremely delicate and is prone to scratching and denting. Therefore, before removing them, you must handle them with extra care.

The first thing you need to do to remove vinyl plank flooring safely is to gather the equipment and supplies you’ll need. For this, gather:
- A knife
- A roller
- A putty knife
- Adjustable pry bar
Now, to remove the vinyl boards’ edges, you need to lose them. Remove any silicone sealant from around the edges of the boards by cutting it with the utility knife. Using the putty knife, carefully pull the planks off the glue after removing the silicone sealant. Keep the knife as flat as possible while performing this to prevent scratches.
Next, pry the planks from the glue using the adapted pry bar, prying at the edges where the boards have become loose. To prevent the glue from separating, apply slow, uniform pressure while starting at one corner.
Use the warmth of a blow dryer to relax the glue if you come across any areas where the planks are obstinate and won't budge.
Then, roll the vinyl planks onto a tube once they are free to hold them secure while the adhesive is peeled off. You can also use a professional adhesive cleaner or a solution of detergent and hot water to remove the glue.
If required, use a putty knife to carefully scrape away the adhesive, not harming the subfloor underneath. Then you can now dispose of the vinyl plank once the adhesive is completely removed.
How Do You Remove and Install Vinyl Plank Flooring?
From above, you must know how to remove the vinyl plank carefully; it’s time to gather information on installing it. For this, you need to follow the below-mentioned steps.
1. Seal Your Subfloor
First, apply a sealant coat to the subfloor. For this, use masking tape to cover the bottoms of your cabinets and walls to prevent sealant splashes. After sealing the floor, give it the time it needs to cure before installing the vinyl planks.
2. Mark The Floor’s Centerline
Pick the direction you want to install your vinyl planks. After deciding on a course of action, you should take floor measurements to determine the exact location of the center of the middle row. This line will have nails driven into each end, connected by a thread and chalk. Mark your center line on the floor by snapping your string chalk line.
3. Install The Initial Vinyl Plank Flooring Row

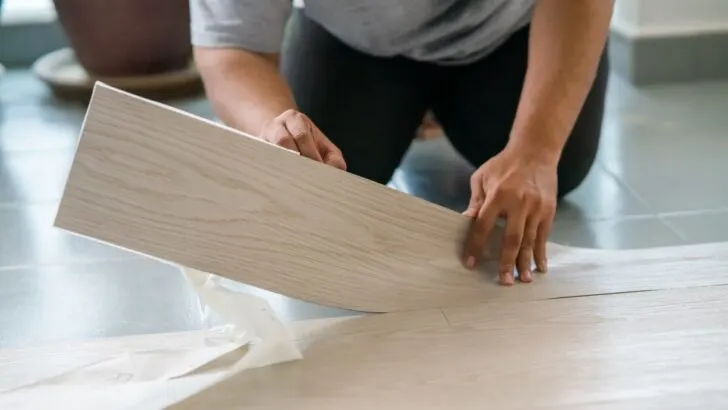
Remove the backing from each vinyl plank and lay it flat across the room’s centerline to create your first row of vinyl flooring. A directional arrow is printed on the backing paper of each vinyl board. Lay all your planks in the same direction facing up for the finest visual effect.
4. Install Additional Vinyl Plank Flooring Rows
Vinyl flooring should be laid in two rows, with the second row directly beside the first. The second row should be staggered so that each plank’s end meets its corresponding middle in the row before it. Planks in the third row should be joined to those in the first row using a combination square. Maintain this rhythm as you move across the floor.
5. Install Vinyl Plank Flooring Near Cabinets
You will likely need to cut some of the vinyl flooring planks to size in order to get them to fit under the kitchen cupboards. Each board will be measured, marked with lines, then cut using a trimming knife.
Going through the cut line more than once will not produce the best results; instead, go over it twice or thrice. When you’re done with the molding, you may peel off the backing and attach the board.
6. Lay a Vinyl Plank’s Short End Down
Sometimes, the short end is all a plank needs to finish a row. Laying the plank in place while the backing is still attached will allow you to measure your cut line quickly. Then, using your combination square, mark the area where it protrudes past the preceding board and cut it there.
Then to glue the plank in place, remove the backing paper. If you need to fill any gaps, you should save your offcuts. And after then, you’re allowed to let the floor sit for 24 hours before beginning the foot traffic on it.
Can You Replace a Section of Vinyl Plank Flooring?
Depending on the installation method, a vinyl plank can be replaced in the event of a damaged piece. To remove the damaged plank, you will need a utility knife, and before removing, sand the edges for proper glue application.
However, the replacement plank should be measured, cut with a jigsaw to size, and installed using glue in the same way as the original once the damaged area has been examined. Also, you need to be extra sure when raising your damaged board, as the tongue and groove of the surrounding boards must be freed for a floating installation.
Afterward, the replacement board must be safely measured, cut, and fitted into the empty gap. Then, it needs to be secured to the nearby planks. In order to replace a damaged board in a click installation, you must first unlock it by pressing down on its sides.
Conclusion to Removing and Reinstalling Vinyl Flooring
This guide discusses how you can easily remove and ruse your vinyl flooring planks. However, one step you must remember before removing the floor is to be extra gentle with the flooring sections. If you tend to remove it with maximum force, you’ll damage it.
Therefore, follow the instructions mentioned above to make your removal process smoother. In this guide, we discussed how you can easily remove and reinstall vinyl plank flooring. Since they do not break up easily while removed, it’s great to reuse them and save money.
However, while reinstalling them, make sure you’re following the above-mentioned steps to make your process smoother. And lastly not to forget, allow your floor to rest for a minimum of 24 hours before beginning the foot traffic.
