
If you need to replace your window well covers you’ll quickly discover that the off-the-shelf options can be expensive! In this article, I’ll be covering how to build your own set of DIY window well covers from wood for a fraction of the price.
Any successful DIY project requires a bit of planning, so here’s a quick list of the tools that you’ll find useful for this project.
Tools & Supplies Needed
Tools:
- Drill or impact driver
- Tap measurer
- Saw
- Sawhorses (optional but handy!)
Supplies:
- 1″ x 4″ pressure-treated board
- 2″ x 4″ pressure-treated board
- 2″ outdoor wood screws
Tip: I’ll show you how to find out exactly how many boards are needed once you’ve had a chance to measure your window well(s).
Table of Contents
Steps for DIY Window Well Covers
Step 1: Measure your Window Wells
In order to know exactly how many boards will be needed for the project, you’ll need to go out and measure the size of your window wells. Make sure to measure each and every window well that will need a new cover as it’s common for a home to have more than one size.
There may also be variations between each that require slight differences in the assembly, so make a few measurements, jot them down somewhere handy, and get ready to cut!
You will need to find the widest part of the well (likely next to the house) and it’s maximum depth (house to front lip).


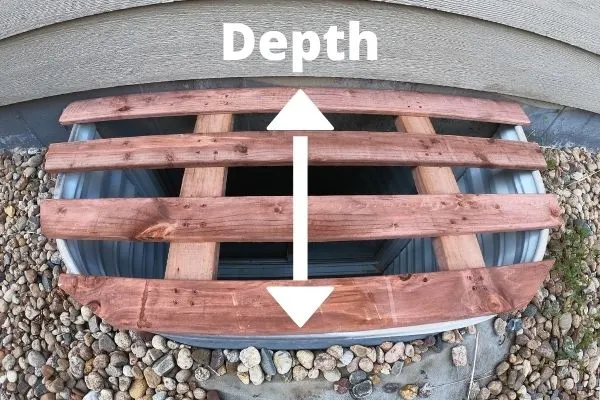
Tip: For the depth measurement, make sure to measure to the inside edge of the window well cover to ensure that the vertical runners will just fit inside of the well.
Now – make sure that you write down these measurements somewhere safe so that you don’t lose them and need to remeasure!
Repeat these measurement steps for each window well. Measuring to the nearest 1/8 inch is precise enough for this project.
Step 2: Calculate Materials Needed
Once you have all of your measurements, you’ll need to do some quick math to ensure that you purchase enough raw materials i.e. wood.
I’ll walk through how to make this simple calculation with my window well sizes, but you’ll need to apply the same approach to your own since they are likely different in size!
I used 2×4-inch boards for my vertical runners, and 1×4-inch boards for the horizontal ones, but if you’d prefer to use something stronger like all 2×4’s then that certainly will work as well.
Each window well cover has two vertical runners, so you’ll want to multiply the depth by 2 for each window well and add them up. In my case, I had 3 window wells that were 24 inches deep, and 1 that was 36 inches deep.
Ex. (24 inches * 2 * 3) + (36 inches * 2) = 216 total inches
Now that you’ve got the total amount of wood, you’ll want to add 10% for overage, mistakes, etc… to bring the total in my case to 238 inches. Now divide that total by the length of boards that you’ll be using.
8-foot lengths (72 inches) are the most common but just double-check here.
Ex. 238 / 72 = 3.3
Round up to the nearest whole board since you typically can’t purchase partial lengths i.e. 4 in this example. In my setup, this is how many treated 2x4s I then purchased for the project.
Next up, it’s time to figure out how many 1x4s that you will need!
For this step, you can choose to add more or less boards, but for safety, I chose to have a board roughly every 6 inches.
For a 24-inch depth, that meant that 3 of my window wells would have 4 horizontal boards, and I used 5 on my larger (36-inch well).
To calculate the linear feet needed for each window well:
- Add 4 inches to the width measurement for each well (to allow for overhang)
- Multiply by the number of boards on that well
- Repeat steps 1-2 for each well and add together to get a total linear feet
- Divide the total linear feet by the board length (likely 8 feet again)
- Round up to the nearest whole board
Take a deep sigh of relief now that the math is complete!
With the math out of the way, head to your local hardware or lumber supply store to purchase the necessary number of 1x4s and 2x4s. Make sure to use pressure-treated lumber as it will be exposed to the wind, rain, snow, etc…
Tip: If you’re worried about messing up the math, go ahead and buy a couple extra of each as you can always return them later!
Step 3: Cut Your Boards
Using your previous measurements, go ahead and cut down all of the 1x4s and 2x4s down to their respective measurements.
The cuts for the 1x4s don’t need to be perfect, just reasonably close in length as you will be trimming many of them later on.
You will want to try and get the 2x4s very close to their measurements as you want them to have a snug fit in the window well.
Because of the bend in the window well, I’d recommend cutting the 2x4s about 2 inches shorter than your actual measured width to ensure that they’re able to slide down inside the well.
A circular or table saw will make this much easier, but you can always complete this step with a hand saw if needed as well.
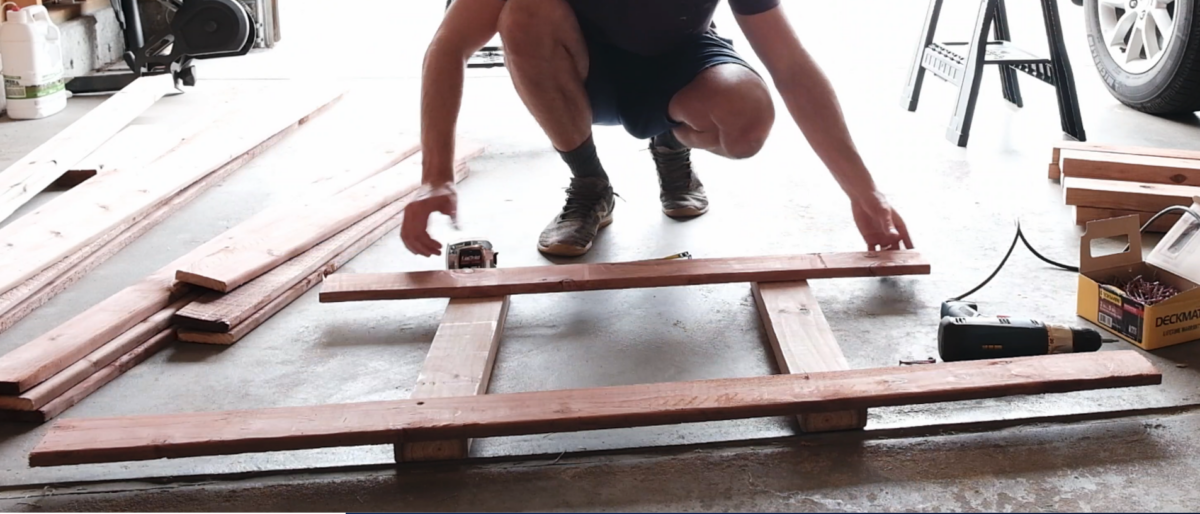
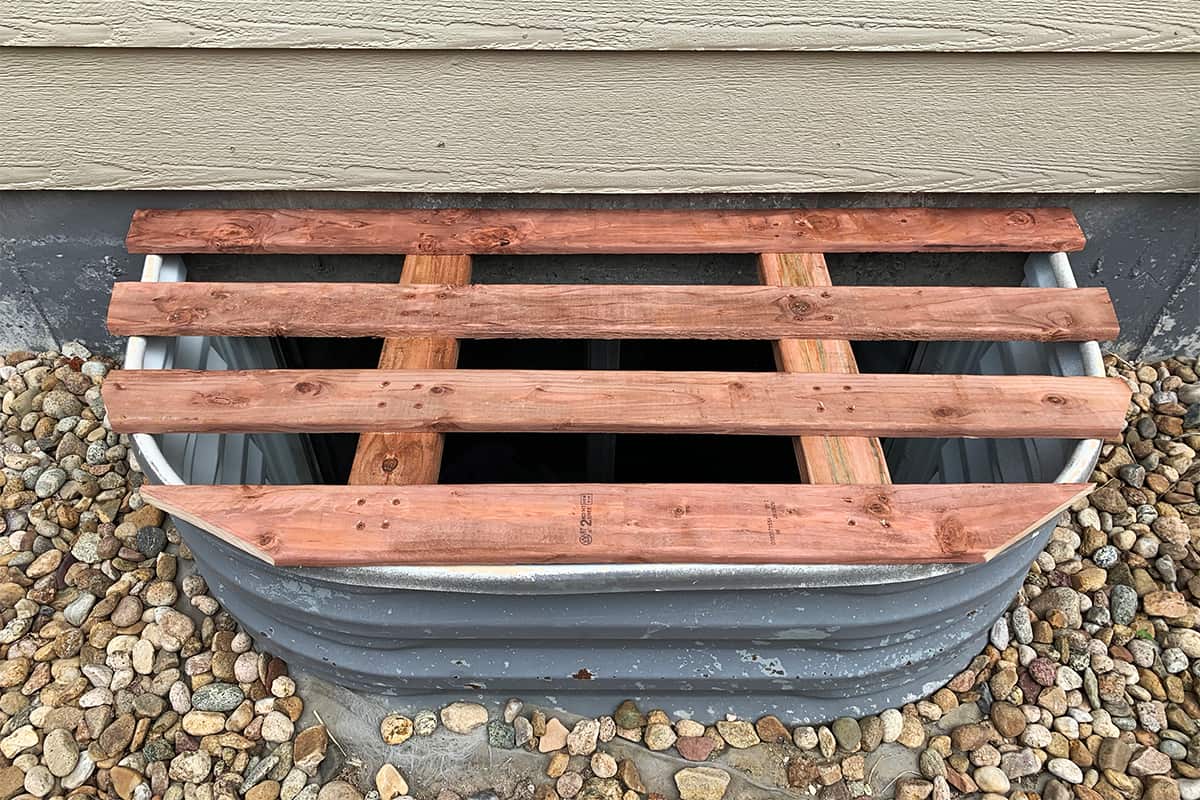
Step 3: Assemble The Window Well Frame
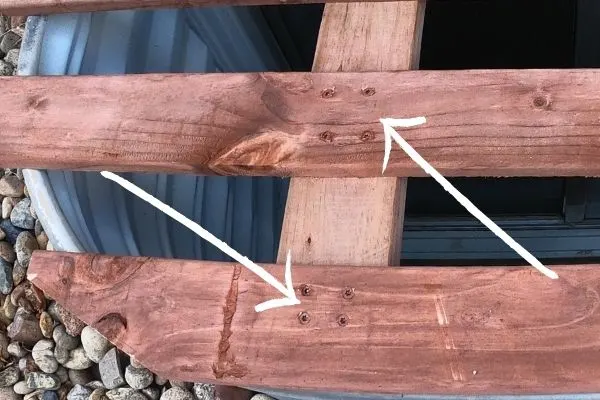
Lay two 2x4s on the ground parallel to each other that are spaced out by half the width of the window well. Lay one 1×4 across one end, and a second 1×4 across the other end.
Allow each 1×4 to hang 1 inch off the end of the 2×4 so that it can act as a catch.
Use a single screw to attach the 1×4 and 2×4 at each spot where they cross (4 total).
Take the frame to the well and do a quick test fit to ensure that it’s able to fit down in the well. If the 2x4s are too long to allow the frame to sit down inside, then they are too long and will need to be trimmed shorter.
This is also a good chance to ensure that the ends of the 1x4s go past the edge of the window well and leave an overhang. Too much overhang is okay as these ends can be trimmed down later.
However, not fully going past the window well edge is bad because it won’t be strong.
If need be, unscrew and re-screw the boards to make everything line up correctly, and only move on once it all lines up!

Step 4: Add The Remaining Boards
Once you’ve confirmed that the window well cover properly fits, add the remaining screws to the existing end boards to lock them into place. I used 4 screws on each board for extra security.
After securing the end boards, add the middle boards and secure them in place with several (3-4) screws at each crossing point.
The middle boards should be evenly spaced out to prevent there from being any overly large gaps in the cover.
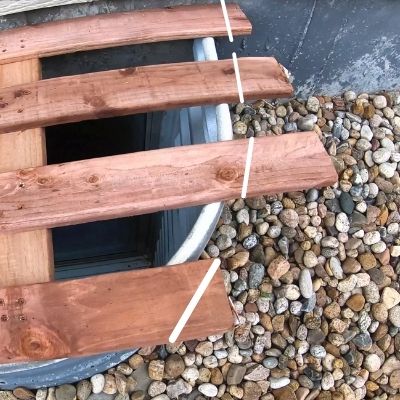
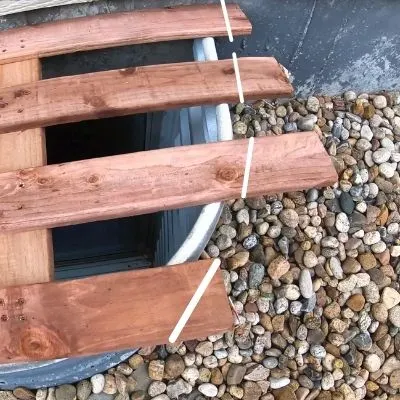
Step 5: Trim The Board Ends (optional)
At this point, you should have a fully functional window well cover that’s ready to serve its purpose!
However, if you want to tidy things up a little by trimming the excess edges off that will make them look a little nicer.
I used a straight edge to mark a line in pencil that left at least a 1-inch overhang past the well edge and then used my saw to trim it off.
Repeat this process for any remaining window well covers and you can call this project done!
Conclusion on DIY Window Well Covers
It’s worth pointing out that these window well covers are meant to prevent deadly accidents, not be used for common activity. Children, pets, and adults should avoid playing on or around them.
Because these window well covers are made from wood, you’ll also find that they will need to be replaced over time. While treated wood slows the rotting process, eventually the sun and moisture will weaken the wood to the point that it’s no longer safe and will need to be replaced.
These window well covers cost around $25 each to make and two hours of time. Which felt like a steal compared to the overpriced flimsy plastic ones found in most hardware stores!
Related Articles
If you found this article helpful, then make sure to also take a look at some of these related posts before you go!
